Description
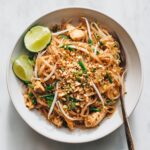
Love ordering Chicken Pad Thai at your favorite Thai restaurant? Now you can make Chicken Pad Thai at home! Easier, more affordable, and even more delicious than the one at your fav Thai place!
Ingredients
Noodles
16 oz. fresh rice noodles (or 16 oz. dry, medium-width rice noodles)
Pad Thai Sauce
½ of a tamarind block or ¾ cup tamarind concentrate
¾ cup palm sugar, finely chopped
¾ cup brown sugar
⅓–½ cup fish sauce
½ cup water
Pad Thai Stir-Fry Ingredients
1.5 lbs thinly sliced chicken breast or thighs
2-3 tbsp oyster sauce or soy sauce
4–6 tablespoons coconut oil (or oil of choice)
6 garlic cloves, minced
2 shallots, finely chopped (optional)
4 eggs, beaten
2 cups Thai fried tofu, or extra firm tofu (optional)
1.5 cups fresh green onions or Chinese garlic chives, usually one bunch, cut into 2-inch pieces
2 cups fresh bean sprouts –
¼ cup preserved radish, chopped (optional)
Toppings to Have on the Table
Sugar
Crushed peanuts
Lime wedges
Extra bean sprouts & green onions
Instructions
Step 1: Marinate the Chicken
Place 1.5 lbs boneless, skinless chicken breast or thighs, thinly sliced, in a bowl and toss with 2–3 tablespoons oyster sauce. Let it marinate for at least 10–15 minutes while you prep the rest of the ingredients. Or, if you have time, let it marinate overnight for even deeper flavor.
Step 2: Soak the Noodles
If using 16 oz. fresh rice noodles, soak them in room-temperature water for about 30 minutes to help them soften (optional but recommended). For 16 oz. dry rice noodles, soak in room-temperature water for about 1 hour until they wrap easily around your finger. Drain and set aside.
Step 3: Make the Sauce
If using ½ of a tamarind block, cover it in about 1 cup warm water for 10 minutes to soften. Then press the pulp through a fine-mesh colander using a spatula or spoon, scraping the paste from the underside of the colander. Discard the seeds and fibers.
For the traditional Thai method, which is what I do, you can use your hands to squeeze out the pulp, make a paste, and throw away the seeds and fibers.
Measure out ¾ cup of the paste. Or, if you prefer the easiest route, use ¾ cup jarred tamarind concentrate.
In a small pot, combine the tamarind with ¾ cup palm sugar, ¾ cup brown sugar, ⅓–½ cup fish sauce, and ½ cup water. If you prefer a less sweet Pad Thai, start with ½ cup palm sugar and ½ cup brown sugar and adjust to taste.
Heat gently, stirring until the sugars dissolve. Taste and adjust:
- More tamarind for sourness
- More sugar for sweetness
- More fish sauce for savory depth
Step 4: Cook the Aromatics and Chicken
Important note: Only cook two servings of noodles at a time so they don’t get gummy from too much moisture. You will do this recipe in two batches.
To keep the noodles from clumping, cook the protein separately. Heat 2–3 tablespoons coconut oil over medium-high heat in a large cast iron skillet or wok. Add 3 garlic cloves, minced and 1 shallot, minced (optional), stirring until fragrant. Add all the marinated chicken and cook just until cooked through. Remove chicken and set it aside on a plate.
Step 5: Add the Eggs
Add a little more oil if needed to the same pan, turn it to high, then pour in 4 beaten eggs. Scramble until just set, breaking into small curds.
Step 6: Cook the Noodles
Add more oil if the pan looks dry, then add half the noodles and a ladle of sauce. Toss constantly with two spatulas so they don’t clump, adding sauce gradually until the noodles are just tender but not mushy. Add a splash of water if needed.
Step 7: Combine everything
Once the noodles are cooked, add 1 cup fried tofu strips (if using), half of the cooked chicken, 3/4 cup green onions or garlic chives, 1 cup bean sprouts, and 2 tablespoons preserved radish (if using). Toss everything together until just heated through, then remove from heat. Repeat with the second batch of noodles, sauce, and remaining chicken.
Step 8: Serve with Toppings
Serve immediately and set out bowls of crushed peanuts, lime wedges, extra bean sprouts, green onions, chili flakes, and sugar so everyone can customize their plate just like at a Thai street stall!
Notes
Additions and Substitutions
- Rice Noodles Substitute: glass noodles aka Woon Sen Pad Thai, Korean sweet potato noodles, linguine, fettuccine, or spaghetti. Cook just until al dente.
- Tamarind Substitute: Mix ½ cup rice vinegar + ¼ cup lime juice.
- Palm Sugar Substitute: Light brown sugar or coconut sugar.
- Fish Sauce Substitute: Mix 2 ½ tablespoons soy sauce + 2 ½ tablespoons vinegar + a pinch of salt, or try my Vegan Pad Thai that uses a miso-based fish sauce substitute.
- Bean sprouts substitute: Fresh green beans cut into 2-inch pieces. Thai Hubby is from Sukhothai and they always put green beans in their Pad Thai in that area, so often we just use green beans since where we leave it can be hard to find fresh bean sprouts.
- Chicken Substitute: Pad Thai Beef, Shrimp Pad Thai, pork, tofu, or even mushrooms all work in place of chicken.
- Less sugar: Prefer less sugar? Start with half the sugar, then taste and adjust. Authentic Pad Thai balances sweet, sour, salty, and savory, and this sauce is for 6 servings, so the sweetness is spread out and balanced by tamarind and fish sauce. Try it as written first, then tweak if needed, or add more fish sauce as mentioned in the recipe.
- Dried shrimp (optional): Many Pad Thai vendors in Thailand add tiny dried shrimp for extra umami. I used to always skip them, but now I enjoy the depth of flavor they bring, but often can’t find them in America. If you find some, try adding a tablespoon or two to the stir-fry with the garlic.
Tips for the Best Chicken Pad Thai
- Make ahead: Prep the Pad Thai Sauce and veggies a day or two in advance. Store the sauce in the fridge and chopped veggies in containers, then stir-fry everything fresh when you’re ready to eat and it only takes a few minutes!
- Cook chicken separately: This keeps the noodles from getting overcrowded and helps the chicken stay juicy.
- Add sauce gradually: Too much at once can make the noodles soggy. Add a ladle at a time and let the noodles soak it up before adding more.
- Let everyone add their own toppings: Lime wedges, peanuts, chili flakes, sugar, people love to customize their Pad Thai, just like at a Thai street vendor stall!
Storing and Reheating Pad thai
- Pad Thai is always best fresh from the pan, but if you have leftovers (or you make a little extra like I often do), here’s how to store them:
- Fridge: Keep any leftover Chicken Pad Thai in an airtight container for up to 3 days. The noodles will soften a little but still taste yummy.
- Freezer: I don’t recommend freezing Pad Thai once the noodles are mixed with the sauce, since they can get a weird texture. But the Pad Thai sauce freezes great! Store it in the fridge for up to 2-3 weeks, or freeze for up to 3 months.
- Reheating: To reheat, toss the Pad Thai in a skillet with a splash of water or oil and stir until warmed through. This keeps the noodles from drying out, and maybe add a little sauce if you have it. You can use the microwave in a pinch, but the noodles can turn gummy, so the skillet is my favorite method.
- Prep Time: 20
- Cook Time: 10
- Category: Noodles
- Method: Stir-Fry
- Cuisine: Thai